 rifanmuazin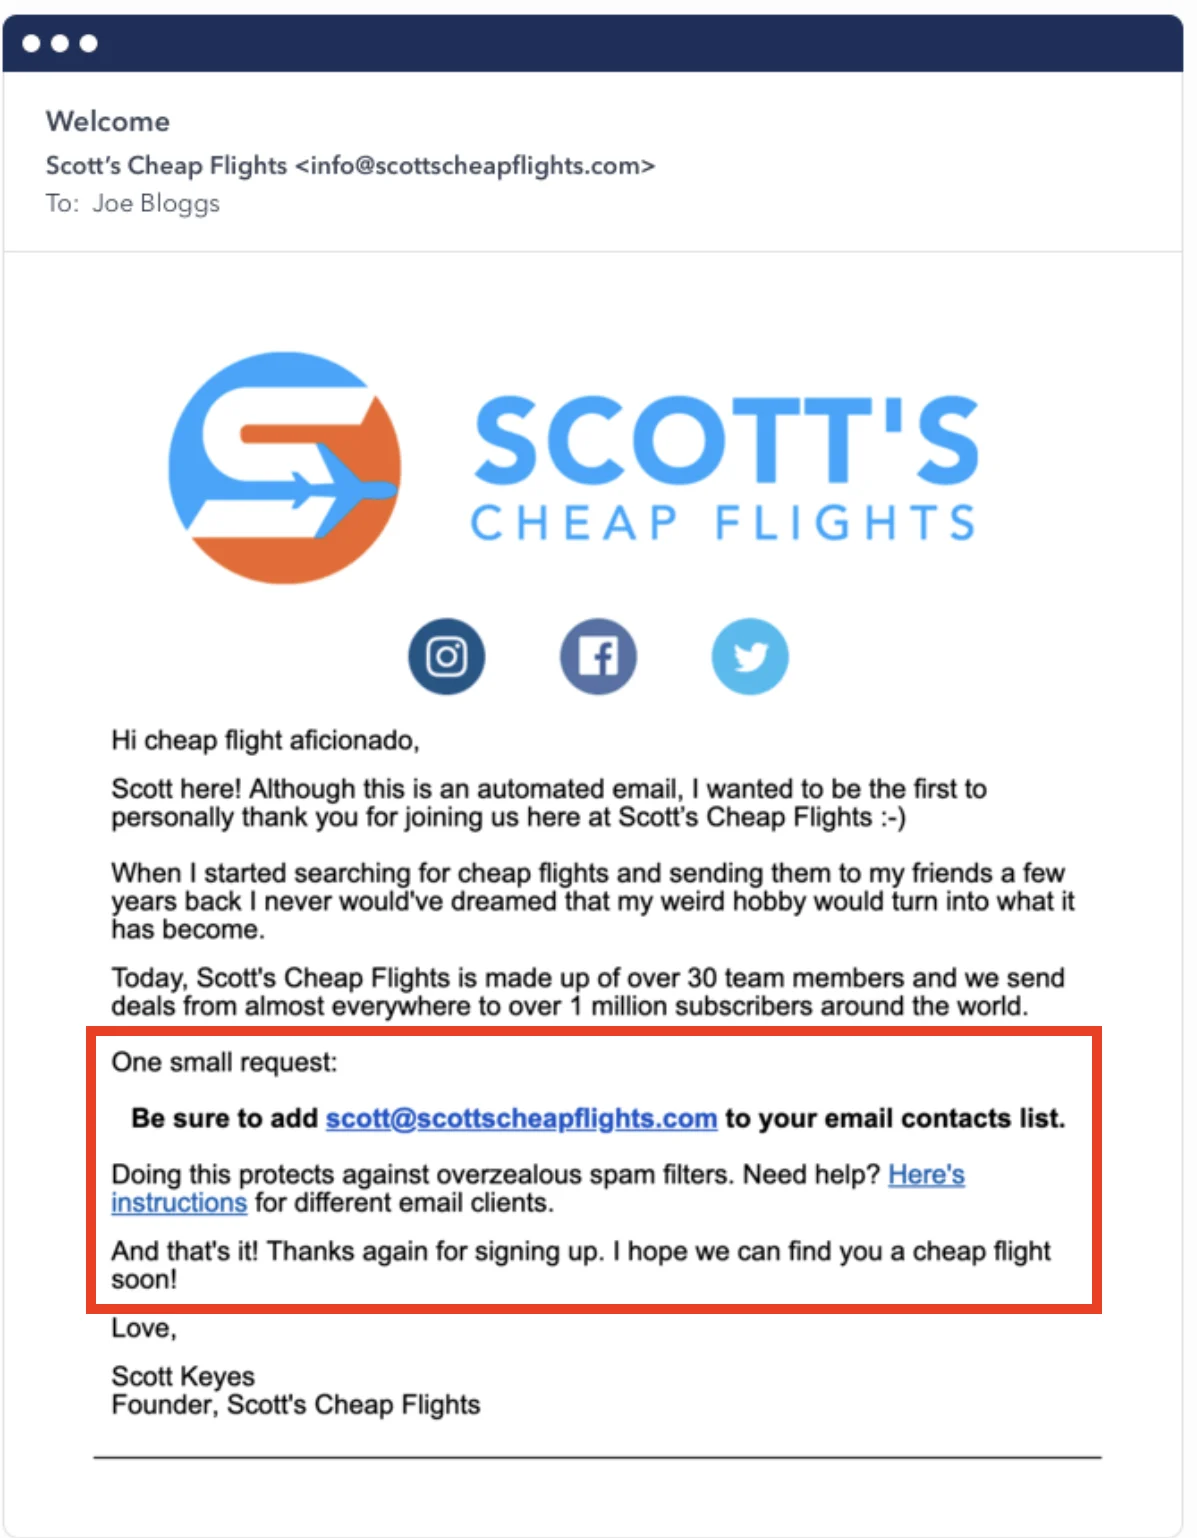
The digital landscape, awash with communication, often presents a paradox: just because an email is dispatched doesn’t guarantee its arrival in the intended inbox. Critical updates, transactional confirmations, and essential brand communications frequently fall victim to increasingly aggressive spam filters, relegating them to the digital purgatory of spam or promotions folders. This widespread issue leads to significant repercussions, including diminished subscriber engagement, lost conversion opportunities for businesses, and a gradual erosion of customer trust. The strategic answer to this challenge lies in understanding and implementing email whitelisting, a process that explicitly signals to email providers that messages from a designated sender are trustworthy and should bypass standard filtering protocols.
This comprehensive guide delves into the mechanics and importance of email whitelisting, offering step-by-step instructions for major email providers. It further illuminates how businesses can effectively educate their subscribers on whitelisting their communications, and critically, what actions to take when messages persist in landing in spam, even after whitelisting efforts.
The Evolving Landscape of Email Deliverability and the Genesis of Whitelisting
The sheer volume of email traffic has necessitated the development of sophisticated filtering systems. In 2023, spam accounted for a staggering 45.6% of global email traffic, a slight decrease from nearly 49% in 2022 but still representing a substantial portion of all emails sent worldwide (Statista, 2023). This deluge of unsolicited mail, ranging from phishing attempts to unwanted advertisements, spurred email service providers (ESPs) like Gmail, Outlook, and Yahoo to deploy increasingly intelligent algorithms, often powered by artificial intelligence and machine learning, to protect users. While these filters are highly effective at blocking malicious or irrelevant content, they occasionally misclassify legitimate emails, leading to the “false positive” dilemma.
Email whitelisting emerged as a user-centric solution to this challenge. At its core, email whitelisting involves adding a sender’s email address or domain to an approved list, thereby instructing your email provider to allow their messages to bypass spam filters and consistently reach your primary inbox. This mechanism empowers recipients to exert greater control over their incoming mail, ensuring they receive communications they genuinely desire. For trusted senders, it offers a vital pathway to maintain visibility and ensure their messages are seen.
Consider the common scenario: an online order is placed, and the expected confirmation email is nowhere to be found in the primary inbox. A subsequent check of the spam folder reveals the message nestled amongst unsolicited junk. This frustrating experience, detrimental to both consumer and brand, is precisely what whitelisting aims to prevent. It acts as a direct declaration to the email provider: “I trust this sender, and I want to receive their emails.”
While the terminology may vary—some platforms refer to it as an “allowlist” or a “safe senders list”—the fundamental function remains consistent across Gmail, Outlook, Apple Mail, and other clients. It stands in direct opposition to an email blacklist, which serves to block unwanted senders, whereas whitelisting ensures the delivery of desired communications. This guide caters to both individual recipients seeking to secure important emails and marketers striving to optimize their campaign reach.
User-Centric Whitelisting: A Step-by-Step Guide for Major Email Providers
For recipients, learning how to whitelist an email address is a proactive step towards ensuring the reliable delivery of critical information such as order confirmations, account updates, and essential alerts. For marketers, understanding these processes is key to guiding subscribers effectively.
Whitelisting in Gmail: Creating a Permanent Filter
Gmail’s approach to whitelisting centers on creating a permanent filter, which is significantly more robust than merely marking a single email as “Not Spam.” A filter establishes a standing rule for your inbox, guaranteeing future messages from the designated sender are routed to your primary inbox.
Follow these steps to whitelist an email address or domain in Gmail:
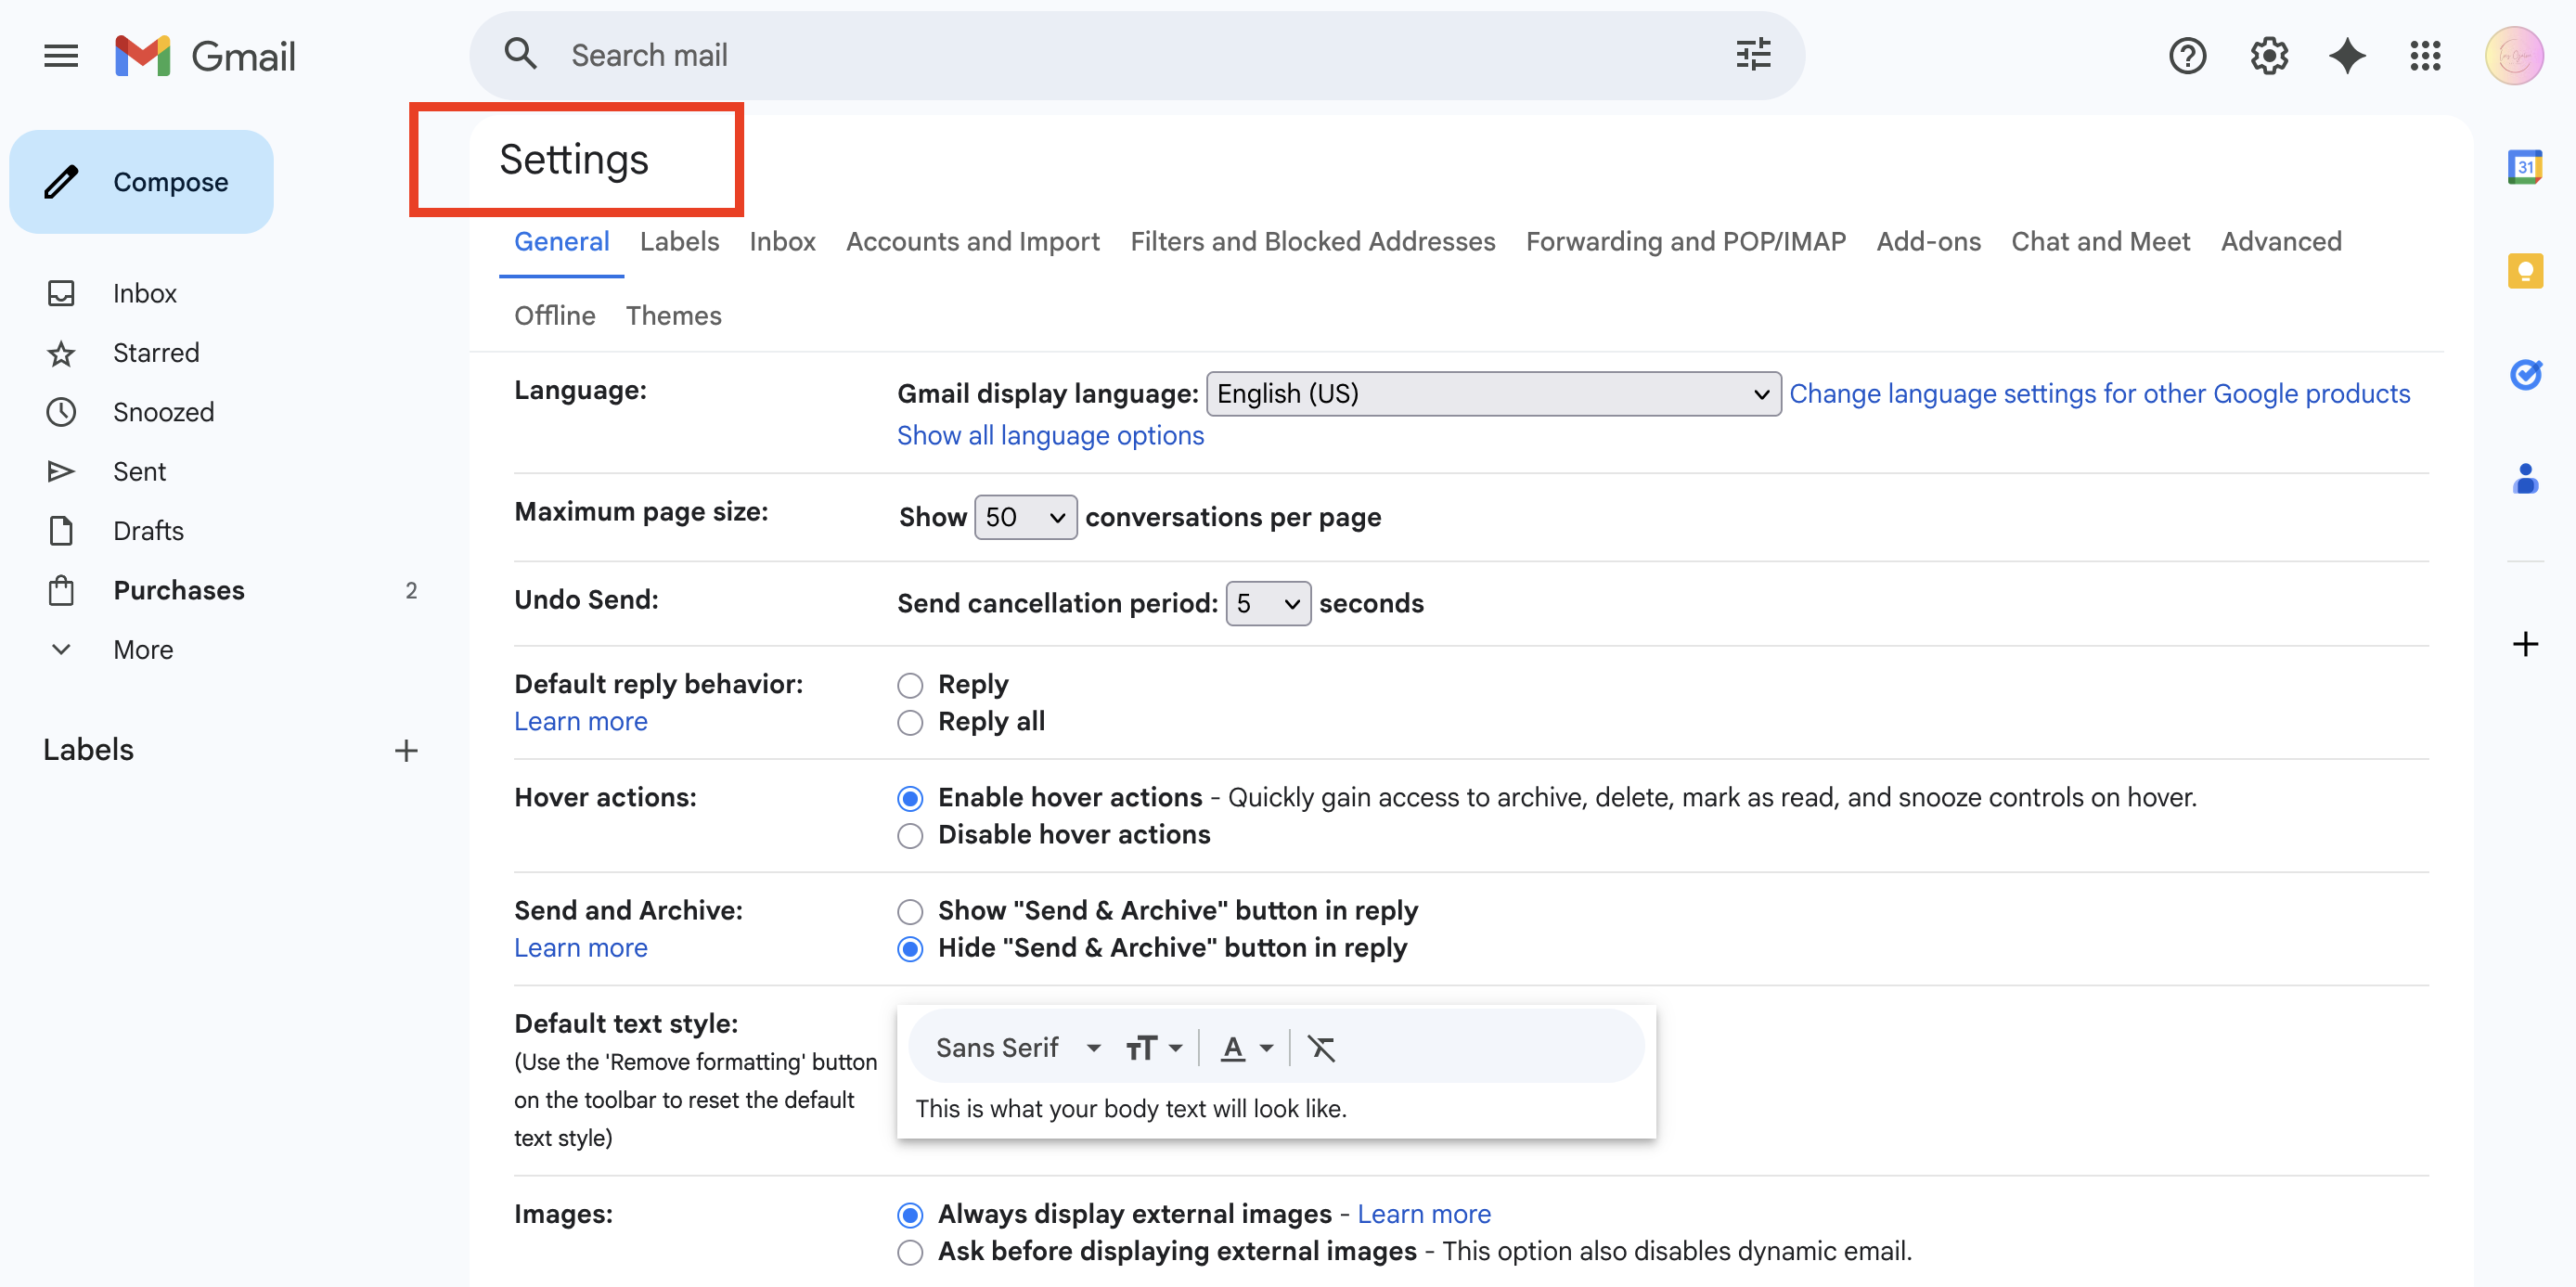
- Step 1: Access Settings: Open Gmail and locate the Settings gear icon in the top-right corner of the interface. Click on it.
- Step 2: Navigate to All Settings: From the dropdown menu that appears, select See all settings.
- Step 3: Open Filters Tab: In the top navigation bar of the settings page, click on the Filters and Blocked Addresses tab.
- Step 4: Initiate New Filter Creation: Select Create a new filter to begin the process.
- Step 5: Specify Sender: In the “From” field of the filter creation window, enter the exact email address you wish to whitelist (e.g.,
[email protected]).- Pro-Tip for Domains: To whitelist all emails from a specific company, enter their domain in the format
@brand.com(e.g.,@omnisend.com). This ensures every address from that domain is trusted.
- Pro-Tip for Domains: To whitelist all emails from a specific company, enter their domain in the format
- Step 6: Confirm Filter Creation: Click Create filter to proceed to the next stage.
- Step 7: Define Action: In the subsequent window, check the box labeled Never send it to Spam. Optionally, you can also check “Always mark it as important” or “Categorize as” to further control its placement. Click Create filter again to save your rule.
Handling the Promotions Tab: If a legitimate email consistently lands in your “Promotions” tab and you prefer it in your “Primary” inbox, simply drag and drop the email from “Promotions” to “Primary.” A prompt will appear asking if you wish to apply this action to all future messages from that sender. Confirm by clicking “Yes.”
Mobile (Android) Considerations: Since Gmail is the default email client on Android devices, any filters established on your desktop will automatically synchronize and apply to your mobile Gmail application, ensuring consistent deliverability across platforms.
Whitelisting in Outlook: Managing Safe Senders
Whitelisting in Outlook involves adding senders to your “Safe Senders list.” The exact steps vary slightly depending on whether you are using the new Outlook interface (web-based) or the classic desktop application.
New Outlook and Outlook on the Web
For users of the new Outlook experience or Outlook accessed via a web browser, senders are whitelisted by adding them to the Safe senders and domains section within the Junk email settings.
- Step 1: Access Settings: Open Outlook and click the Settings gear icon in the top-right corner.
- Step 2: Navigate to Mail Settings: In the left sidebar of the settings pane, select Mail.
- Step 3: Open Junk Email: Click on Junk email from the Mail options.
- Step 4: Access Safe Senders: Under the “Senders” section, locate and open the Safe senders and domains tab.
- Step 5: Add Sender: Click the + Add safe sender button and accurately input the sender’s full email address or domain.
- Step 6: Save Changes: Click OK and then Save to apply your changes.
Classic Outlook (Desktop App)
In the traditional Outlook desktop application, whitelisting is managed through the Junk E-mail Options window.
- Step 1: Go to Home Tab: Open classic Outlook and navigate to the Home tab in the ribbon.
- Step 2: Access Junk Options: Within the “Delete” group, click on the Junk dropdown menu.
- Step 3: Select Junk E-mail Options: From the options presented, choose Junk E-mail Options.
- Step 4: Open Safe Senders Tab: In the “Junk E-mail Options” dialog box, click on the Safe Senders tab, then click Add.
- Step 5: Enter Address/Domain: Type the sender’s email address or domain (e.g.,
@brand.com) into the provided field. - Step 6: Confirm: Click OK to add the sender, and then OK again to close the “Junk E-mail Options” window.
Organizational Whitelisting (Microsoft 365 Admins): For organizations managing Microsoft 365, individual whitelisting is inefficient. Administrators should leverage the Microsoft Defender admin center to configure “Tenant Allow/Block Lists” for organization-wide email allow rules.
Whitelisting in Yahoo Mail, Apple Mail, and Other Clients
The process for whitelisting varies across other popular email clients, often involving filters or contact list integration.
Yahoo Mail
Yahoo Mail uses a filter-based approach, similar to Gmail, to ensure trusted emails land in the Inbox.
- Step 1: Access More Options: Open Yahoo Mail and click More (often represented by three dots or lines).
- Step 2: Open Settings: Select the Settings gear icon.
- Step 3: Navigate to Filters: In the settings panel, click Filters.
- Step 4: Add New Filter: Select Add new filters and assign a descriptive name (e.g., “Safe Senders”).
- Step 5: Set Rule Condition: Under the “Set rules” section, ensure the “Sender” field is set to Contains.
- Step 6: Enter Value: Type the email address or domain you wish to whitelist into the value field.
- Step 7: Define Destination: Under “Choose a folder to move to,” select Inbox and then click Save.
Apple Mail
Apple Mail employs different methods for macOS and iOS/iPadOS to whitelist senders.
macOS (Desktop)
On a Mac, users create a rule within the Mail app to direct messages from a specific sender to their inbox.
- Step 1: Open Mail App: Launch the Mail application on your Mac.
- Step 2: Access Mail Menu: In the top menu bar, click Mail.
- Step 3: Open Settings/Preferences: Select Settings or Preferences, depending on your macOS version.
- Step 4: Add New Rule: Click Rules then Add Rule.
- Step 5: Name the Rule: Give your rule a clear name (e.g., “Whitelist [Sender Name]”).
- Step 6: Set Condition: Configure the condition to If [any] of the following conditions are met: [From] [contains].
- Step 7: Enter Sender: Input the email address or domain in the text field.
- Step 8: Define Action: Under “Perform the following actions,” select Move Message to mailbox: Inbox.
- Step 9: Confirm and Apply: Click OK and choose to apply the rule to your current messages if prompted.
iPhone and iPad (iOS/iPadOS)
On mobile Apple devices, whitelisting is primarily achieved by adding the sender to your contacts, which the Mail app recognizes as a trusted source.
- Step 1: Open Email: Open an email from the sender in the Mail app.
- Step 2: Tap Sender Info: Tap on the sender’s name or email address at the top of the email.
- Step 3: Create/Add Contact: Choose either Create New Contact or Add to Existing Contact.
- Step 4: Save Contact: Complete the contact information and save it.
Other Clients (AOL Mail, Android): For clients like AOL Mail, whitelisting often involves clicking the sender’s name and selecting “Add Contact” or marking unwanted messages as “Not Spam.” On Android, the specific steps typically mirror the desktop version of your email provider (e.g., Gmail’s filter system applies), and saving a contact on one device usually syncs that trust signal across your account.
Strategic Imperatives for Marketers: Guiding Subscribers and Best Practices
For ecommerce marketers, whitelisting is a crucial support tactic, but it must be integrated within a broader strategy of robust sender practices. Effective authentication, consistent sending habits, and intelligent email list management remain foundational to optimal inbox placement.
Empowering Subscribers to Whitelist Your Emails
Marketers cannot directly whitelist their own emails on a subscriber’s behalf; this action must originate from the recipient’s inbox. Therefore, the primary task for marketers is to provide clear, concise instructions within their email communications.
Key Placement Strategies:
- Welcome Emails: This is the ideal first opportunity, as subscribers are highly engaged and expecting your initial message.
- Double Opt-in Confirmation Emails: Leverage this moment of confirmed intent to reinforce the request.
- Email Footers: A subtle, persistent reminder in every email footer.
Subscriber-Friendly Language: Avoid technical jargon like “whitelist.” Instead, use clear, actionable phrases such as:
- “Add us to your contacts.”
- “Mark this email as safe.”
- “Move us to your primary inbox.”
- “Drag this email to your ‘Primary’ tab.”
Template for Welcome Email/Footer:
One small request:

**Be sure to add [your brand email address, e.g., [email protected]] to your email contacts list.**

Doing this protects against overzealous spam filters, ensuring you never miss important updates, exclusive offers, or order confirmations. Need help? **Here are instructions** for different email clients [link to a simple guide on your website].
Contextual Benefits: For ecommerce, explicitly mention the specific benefits of whitelisting: “Ensure you receive timely order confirmations, shipping updates, restock alerts, and subscriber-only offers.” This makes the request tangible and relevant to the subscriber’s interests.
Email Whitelisting Best Practices for Ecommerce Marketers
Whitelisting complements, but does not substitute for, strong sender practices. Here are five essential best practices:
-
Implement Robust Sender Authentication (SPF, DKIM, DMARC):
- Action: Before asking subscribers to whitelist, ensure your emails are properly authenticated with SPF (Sender Policy Framework), DKIM (DomainKeys Identified Mail), and DMARC (Domain-based Message Authentication, Reporting & Conformance). These technical standards verify your sending domain, significantly boosting your sender reputation with ISPs. Google’s sender guidelines, particularly for bulk senders, mandate these protocols.
- Analysis: These protocols are the foundational “ID checks” that establish your legitimacy at the server level, independent of individual user preferences.
-
Maintain a Consistent “From” Address/Domain:
- Action: Always send emails from a single, recognizable, and consistent email address or domain across all campaigns and automations.
- Analysis: Subscribers are more likely to recognize and act on a whitelisting request if the sender identity is unambiguous. Consistency builds trust and reduces confusion.
-
Practice Diligent Email List Hygiene:
- Action: Regularly audit and remove inactive, unengaged, or low-quality contacts from your email lists. Suppress segments that show no engagement over extended periods.
- Analysis: Sending to inactive addresses leads to high bounce rates and potential spam trap hits, severely damaging your sender reputation. Even whitelisting cannot counteract the negative signals of a poorly maintained list. Google emphasizes that bulk senders must avoid sending unwanted email, and inactive contacts are a strong indicator of “unwanted.”
-
Utilize Double Opt-in for New Subscribers:
- Action: Enable double opt-in for all new subscribers. Integrate a short, friendly “safe sender” request into the confirmation flow immediately after they confirm their signup.
- Analysis: Double opt-in verifies that an email address is real and that the subscriber genuinely wishes to receive your communications. This proactive step significantly reduces spam complaints and ensures a high-quality, engaged audience from the outset.
-
Monitor Deliverability with Google Postmaster Tools (and similar):
- Action: Verify your sending domain in Google Postmaster Tools (and explore similar tools offered by other ESPs). Regularly review the reputation and compliance data provided.
- Analysis: These tools offer invaluable insights into how your emails are performing, including spam rates, delivery errors, and authentication status. Proactive monitoring allows you to identify and address potential deliverability issues before they escalate and impact your entire sending performance.
Beyond Whitelisting: Understanding Persistent Deliverability Challenges
It is crucial to understand that whitelisting, while effective at the individual inbox level, does not guarantee universal inbox placement. Email service providers (ISPs) still weigh numerous factors, including your domain’s overall reputation, aggregate engagement rates, and the content of your emails. Think of whitelisting as a single homeowner inviting you into their house, while the neighborhood security (the ISP) still conducts its own comprehensive checks on your vehicle and general behavior.
When one person adds your address to their contacts or safe senders list, that action primarily affects their inbox. It does not inherently signal to Gmail, Outlook, Yahoo, or other providers to fully trust your domain on a broader scale. This is a primary reason why emails can still end up in spam even after whitelisting efforts. While personal inbox settings offer a degree of control, mailbox providers apply broader, server-level filtering rules that often carry more weight than individual recipient preferences.
Four critical factors can override an individual whitelisting filter:
- Server-Level ISP Filtering: If an ISP detects overarching signs of risk at your domain level—such as sudden spikes in sending volume, unusual sending patterns, or associations with known spamming activities—it may still route your emails to spam, irrespective of personal user settings.
- Poor Sender Reputation: High bounce rates (due to invalid addresses), a significant number of spam complaints (even from a small percentage of recipients), or a history of sending unsolicited messages can severely damage your sender reputation. When your domain or IP address is deemed untrustworthy by ISPs, their filters can override individual whitelisting.
- Low Engagement Metrics: ISPs meticulously track recipient engagement. If a large segment of your audience consistently fails to open, click, or reply to your emails, providers may interpret this lack of interaction as a sign that your messages are unwanted. Over time, weak engagement signals can make consistent inbox placement increasingly difficult.
- Content-Related Issues: Even from a whitelisted sender, the content of an email can trigger spam filters. Red flags include:
- Spam Trigger Words: Excessive use of terms commonly associated with spam (e.g., “free,” “winner,” “guarantee,” excessive exclamation marks).
- Broken HTML/Messy Code: Poorly coded emails can appear suspicious.
- Image-to-Text Ratio: Too many images and too little text can trigger filters.
- Misleading Subject Lines: Discrepancies between the subject and content.
- Excessive Links: A high number of links, especially to untrustworthy domains.
Quick Fixes to Address Persistent Deliverability Issues (Beyond Whitelisting):
- Review and Segment Your List: Actively remove unengaged subscribers. Consider re-engagement campaigns for dormant segments before removing them.
- Monitor and Improve Engagement: Analyze open and click rates. Experiment with subject lines, content personalization, and send times to boost subscriber interaction.
- Conduct Content Audits: Regularly check your email content for spam triggers, broken links, and poor formatting. Utilize email preview tools to see how your emails render across different clients.
To truly understand why emails go to spam, marketers must look beyond individual whitelisting and address the systemic sending issues that impact inbox placement at scale.
The Broader Implications: For Businesses and Consumers
The effectiveness of email deliverability, supported by practices like whitelisting, carries significant implications for both businesses and individual consumers.
For Businesses:
- Revenue Loss: Missed transactional emails (order confirmations, shipping updates) or promotional offers directly translate to lost sales and customer frustration.
- Damaged Brand Perception: When customers don’t receive expected communications, it erodes trust and can lead to negative brand associations, regardless of the quality of the product or service.
- Customer Service Strain: Inquiries about missing emails or undelivered orders can overwhelm customer support teams, increasing operational costs.
- Reduced ROI on Email Marketing: If emails aren’t reaching the inbox, the investment in email marketing campaigns yields poor returns, undermining a critical digital marketing channel.
For Consumers:
- Missing Critical Information: Beyond transactional emails, important security alerts, account statements, and essential updates can be missed, leading to potential security risks or financial oversight.
- Frustration and Inconvenience: The constant need to check spam folders for legitimate mail is a source of annoyance and wasted time.
- Distrust in Digital Communication: A consistent failure to receive expected emails can lead to a general distrust in digital communication channels, pushing consumers towards less efficient methods.
The increasing reliance on email for a vast array of critical communications, from personal banking to professional networking, makes robust deliverability more crucial than ever.
Expert Insights and Future Outlook
Industry experts consistently emphasize that while individual whitelisting is a valuable layer of defense, it must be underpinned by robust technical authentication and stringent list management practices. Email providers continue to evolve their filtering mechanisms, prioritizing sender reputation and user engagement as key indicators of legitimacy. The future of email deliverability will likely see even more sophisticated AI-driven filters, further personalizing inbox experiences while simultaneously raising the bar for senders to prove their trustworthiness.
In conclusion, email whitelisting serves as a vital tool for both recipients and senders in the ongoing battle against spam and the quest for reliable communication. By understanding its mechanics and integrating it into a holistic strategy of strong sender practices, businesses can significantly improve their email deliverability, safeguard customer trust, and maximize the effectiveness of their email marketing efforts. For individuals, mastering whitelisting ensures that the messages that truly matter always find their way home.
Frequently Asked Questions
Is whitelisting the same as adding an email address to contacts?
It’s not always identical, but they are closely related. In many email applications (especially mobile ones like Apple Mail on iPhone/iPad), adding a sender to your contacts list is recognized as a strong signal of trust, effectively whitelisting them. In other clients like Gmail or Outlook, while adding to contacts helps, you might also need to create a specific filter or add the sender to a “safe list” for complete assurance.
Is a whitelist the same as an allowlist or a safe senders list?
In most contexts, these terms are synonymous. Different email providers use varying labels, but they all refer to a list of trusted senders whose messages should bypass standard spam filtering. Gmail often uses “filters,” Outlook uses “Safe Senders,” and “allowlist” is a more inclusive, often preferred, modern term. The objective remains the same: preventing wanted emails from landing in spam.
Can I whitelist a full domain instead of one email address?
Yes, most major email clients allow you to whitelist an entire domain (e.g., @example.com) rather than just a single email address. This is highly beneficial for companies that send emails from multiple addresses but under the same brand domain, ensuring all their communications are treated as trusted.
Does whitelisting guarantee inbox placement?
No, whitelisting does not offer a 100% guarantee of inbox placement. While it significantly improves the chances for a specific recipient, mailbox providers still consider a multitude of factors, including your overall domain reputation, history of spam complaints, engagement rates from other subscribers, and the content quality of the email itself. Server-level filters can sometimes override individual whitelisting preferences if a sender’s overall reputation is poor.
How can I check if an address is already whitelisted?
The easiest way is to review your email client’s specific trusted sender settings. In Gmail, check your “Filters and Blocked Addresses” tab. In Outlook, look under “Safe senders and domains” in your junk email settings. For Apple Mail or mobile apps, consult your contact list or established mail rules to confirm if the sender is already marked as trusted.
Can I whitelist an email address on mobile?
Yes, you can whitelist an email address on mobile devices. The method depends on the email app you use. This typically involves adding the sender to your contacts, marking a message as “not spam,” or configuring a rule within the app’s settings. In most cases, mobile settings synchronize with your desktop email client, meaning trusted sender settings often apply across all your devices linked to the same account.